Add Resellers and End Users
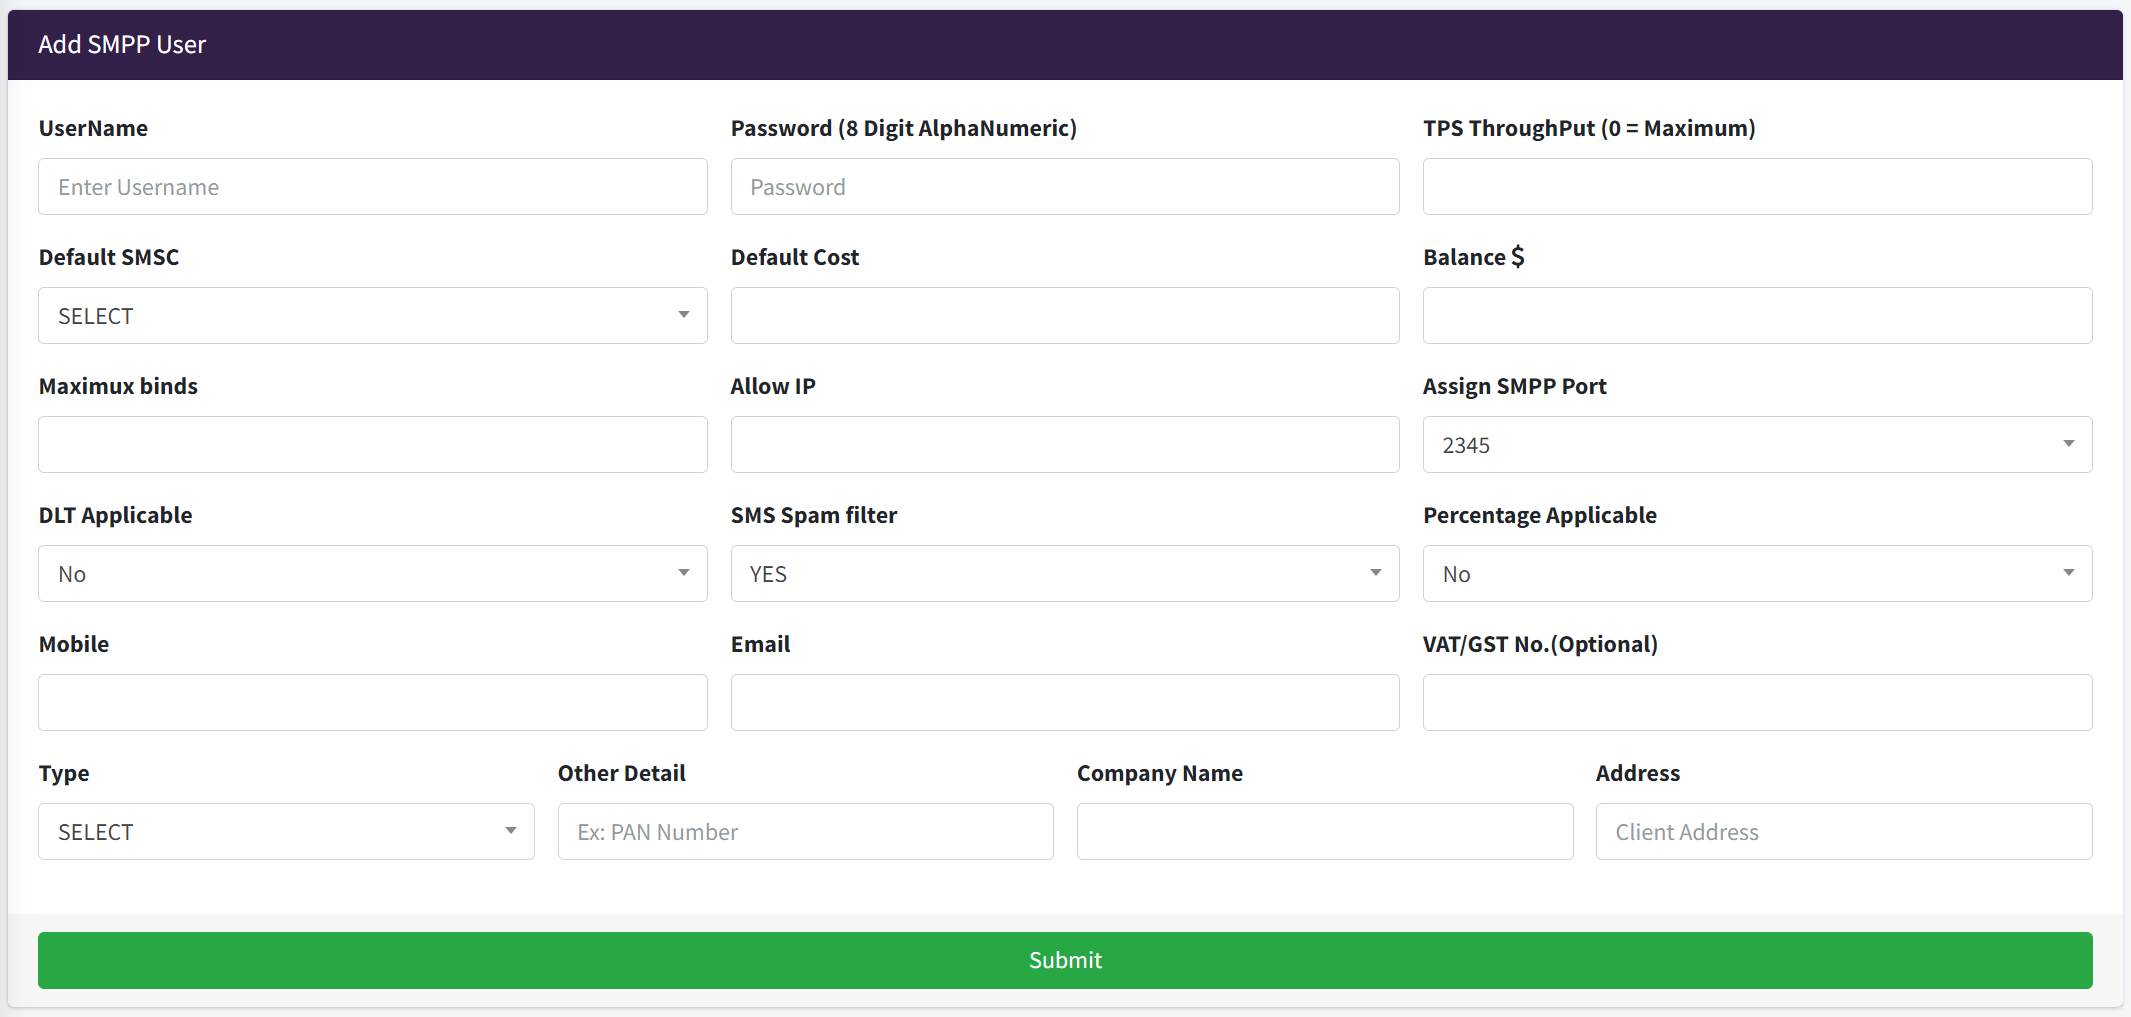
Username :- Client name without any space.
Password :- should be (8 Digit AlphaNumeric) example "Tester@1".
TPS ThroughPut (0 = Maximum) :- Transaction per second.
Default SMSC :- Admin need to assign one default Supplier (SMSC) to customer.
Default Cost :- Admin need to assign one default cost if no route is assigned.
Balance :- Initial Balance.
Maximux binds :- SMPP number of session client can bind. minimum is 1.
Allow IP :- Whitelist the I.P Address of customer .
Assign SMPP Port :- Assign any port.
DLT Applicable :- Only For India Country.
SMS Spam filter :- When customer sending sms from portal or http api, replace spam word with empty.
Percentage Applicable :- Cutting apply when customer sending message from portal or http api.
View Users
View all user crearted by admin, Here you can edit,delete the user details.
View Reseller's
View all resller crearted by admin, Here you can edit,delete the reseller details.
View Reseller User's
In this section admin can see those user's which is created by resellers.
Add SMS Route To User

Select Type :- Select User/Reseller.
Select Customer :- Select User/Reseller Name.
Prefix (Regular Expression) :- Syntax ^(Country Preifx1|Country Preifx2), Example :- ^(91|44|1)
In this section admin can allow country wise traffic Routing with different operators
In the above example admin is assigning prefix route to user , means user is able to send sms to country(India,UK,USA).
SenderID :- Blank For Any, Ex:- ^(TESTER) ,If you will leave empty to this field this mean user can use any senderID.
Cost :- How much balance admin wants to deduct.
SMSC :- Select SMSC Name(Operator) where customer traffic should be passed.
Priority :- Higher number of priority ,higher will be priority. Priority means when admin assigning multiple operator to same customer so need to define operator priority.
View User Assign Route

In this section you can see user assign route and admin is able to change/delete.
View Reseller Route
In this section admin can see the reseller assigned route and he is able to change/delete.
View Resellers User Route
In this section admin can see route of reseller customers.
Add Spam Keyword Here
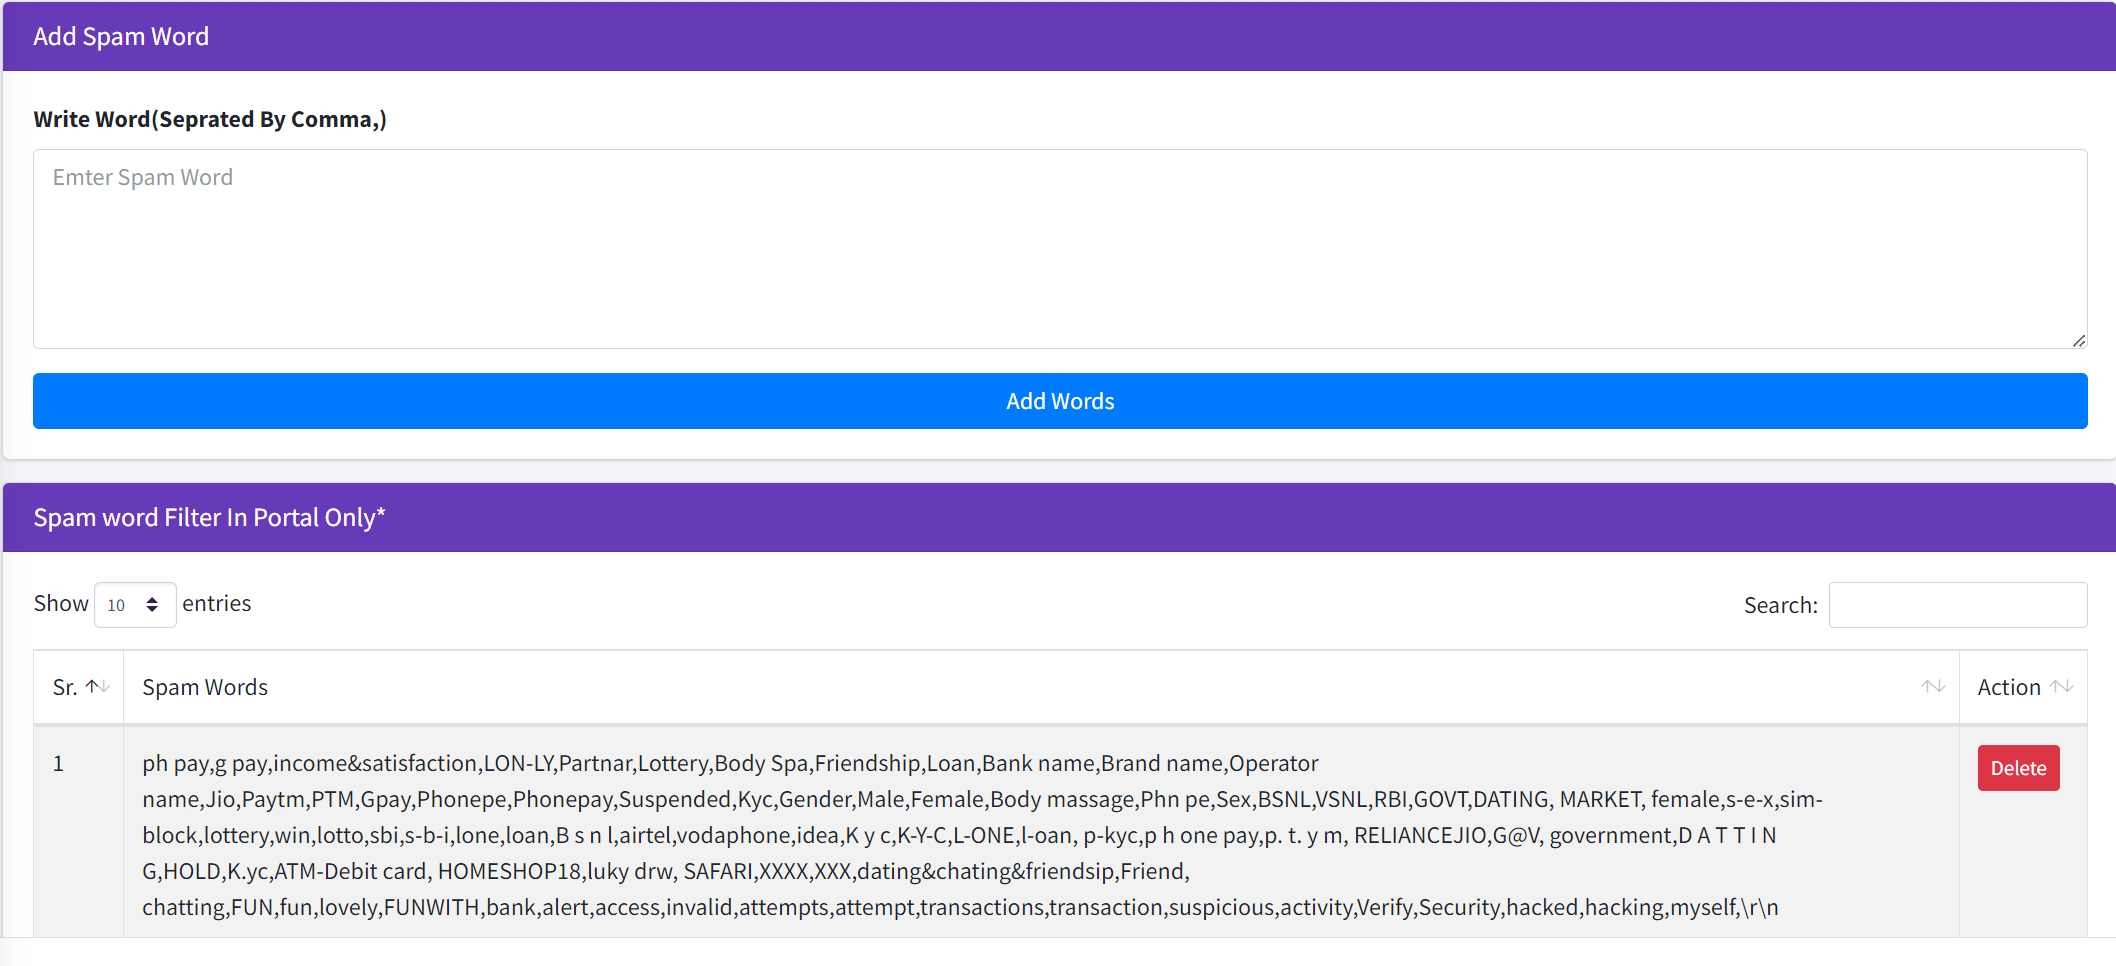
In This section we can add spam keywords with comma separated values. Note This message spam filter only work when customer sending
message from portal or HTTP api, it will not filter smpp messages.
Cutting For Portal
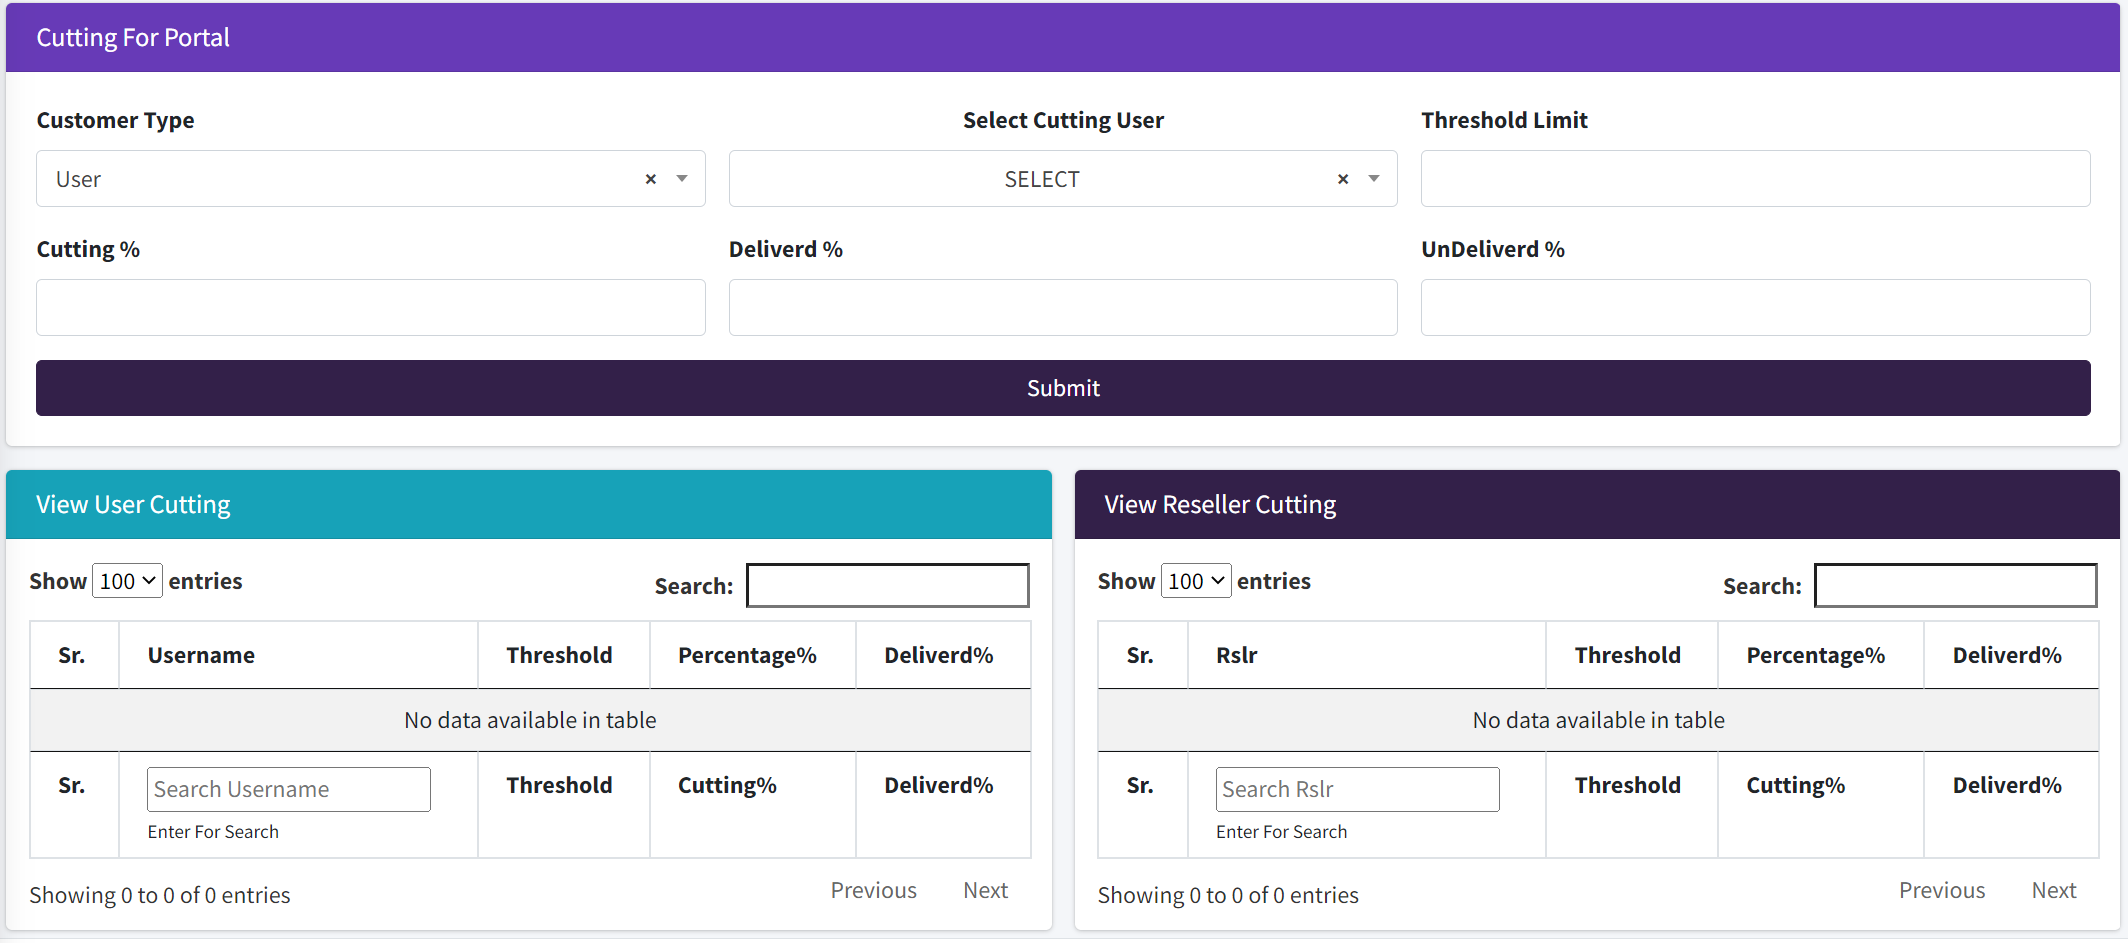
Customer Type :- Select Customer Type User/Reseller.
Select Cutting User :- Select User/Reseller Name.
Threshold Limit :- Limit when cutting start Example: if you set Threshold Limit 10 that means if customer sending more than 10 sms in single shoot then cutting will be applicable.
Cutting % :- You have to set cutting percentage, How much cutting you want Maximum cutting percentage is 100.
Deliverd % :- It means How many sms you want show as deliverd in cutting.
UnDeliverd % :- It means How many sms you want show as UnDeliverd in cutting.
Note :- Deliverd% + UnDeliverd% = 100.
Note :- Cutting is not applicable when customer sending sms from SMPP API.
BlackList
In this section you can upload a C.S.V file which contain only mobile numbers to block. Message will not be deliverd on block mobile numbers.
Note:- Not applicable on smpp messages., Block List between 1-2L.
WhiteList
In this section you can upload a C.S.V file which contain only mobile numbers to prevent from cutting. whitelist mobile number never come under cutting
Note:- Not applicable on smpp messages. Whitelist Limit around 2000
Add Balance

Admin can Add/Deduct Balance to User/Reseller
Balance History Assign by Admin

In this table you can see to whome admin is giving balance by Username, type means wheather customer is Reseller Or User. Amount showing how much balance is given ,Balance Type showing weather Balance Added or Deducted ,CreatedAt showing Datetime and After balance mean final balance after adding or deducting the amount.
Reseller Balance History
In this section admin can see the reseller balance assigning history.
User Batch Report

In this table admin can see all the users message and he can see among total number of sms shoot by user deliverd, undlv and pending this type of infomation admin can see.
Note:- This report only tell those report of user which is shooted by portal or http api.
Instant Activity
In this section you can check the log of kannel gateway , this log file dump into database with in every 10-25 min.
ESME (SMPP) Report
Admin can check all the message resport come from SMPP API, in a form of table.
Username,Mobile,SenderID(From),Message,SMSC(Operator),RATE,Type(Flash/Text),Coding(Unicode/Normal),Status(Deliverd/UnDeliverd/Pending/Reject),MessageID & DateTime
SMPP Reject SMS
In this section you can see the report of those sms which are rejected and send through SMPP API.
Portal SMS Report
In this section you can see all sms report which are sent by portal login or http api.
UserWiseDLR Report

Search the username and you will get the data.
Today Unique Message
In this section you can see the taotal unique sms shoot via portal,http api & smpp api according to username
User Summary

So here two different table showing that from portal how many customer send how many sms from which smsc , we need to click on view button.
and another table showing that how many customers has send sms from SMPP api from which smsc.
SMSC Performance

In this section we can check that which SMSC(Operator) perform good.
Test Route
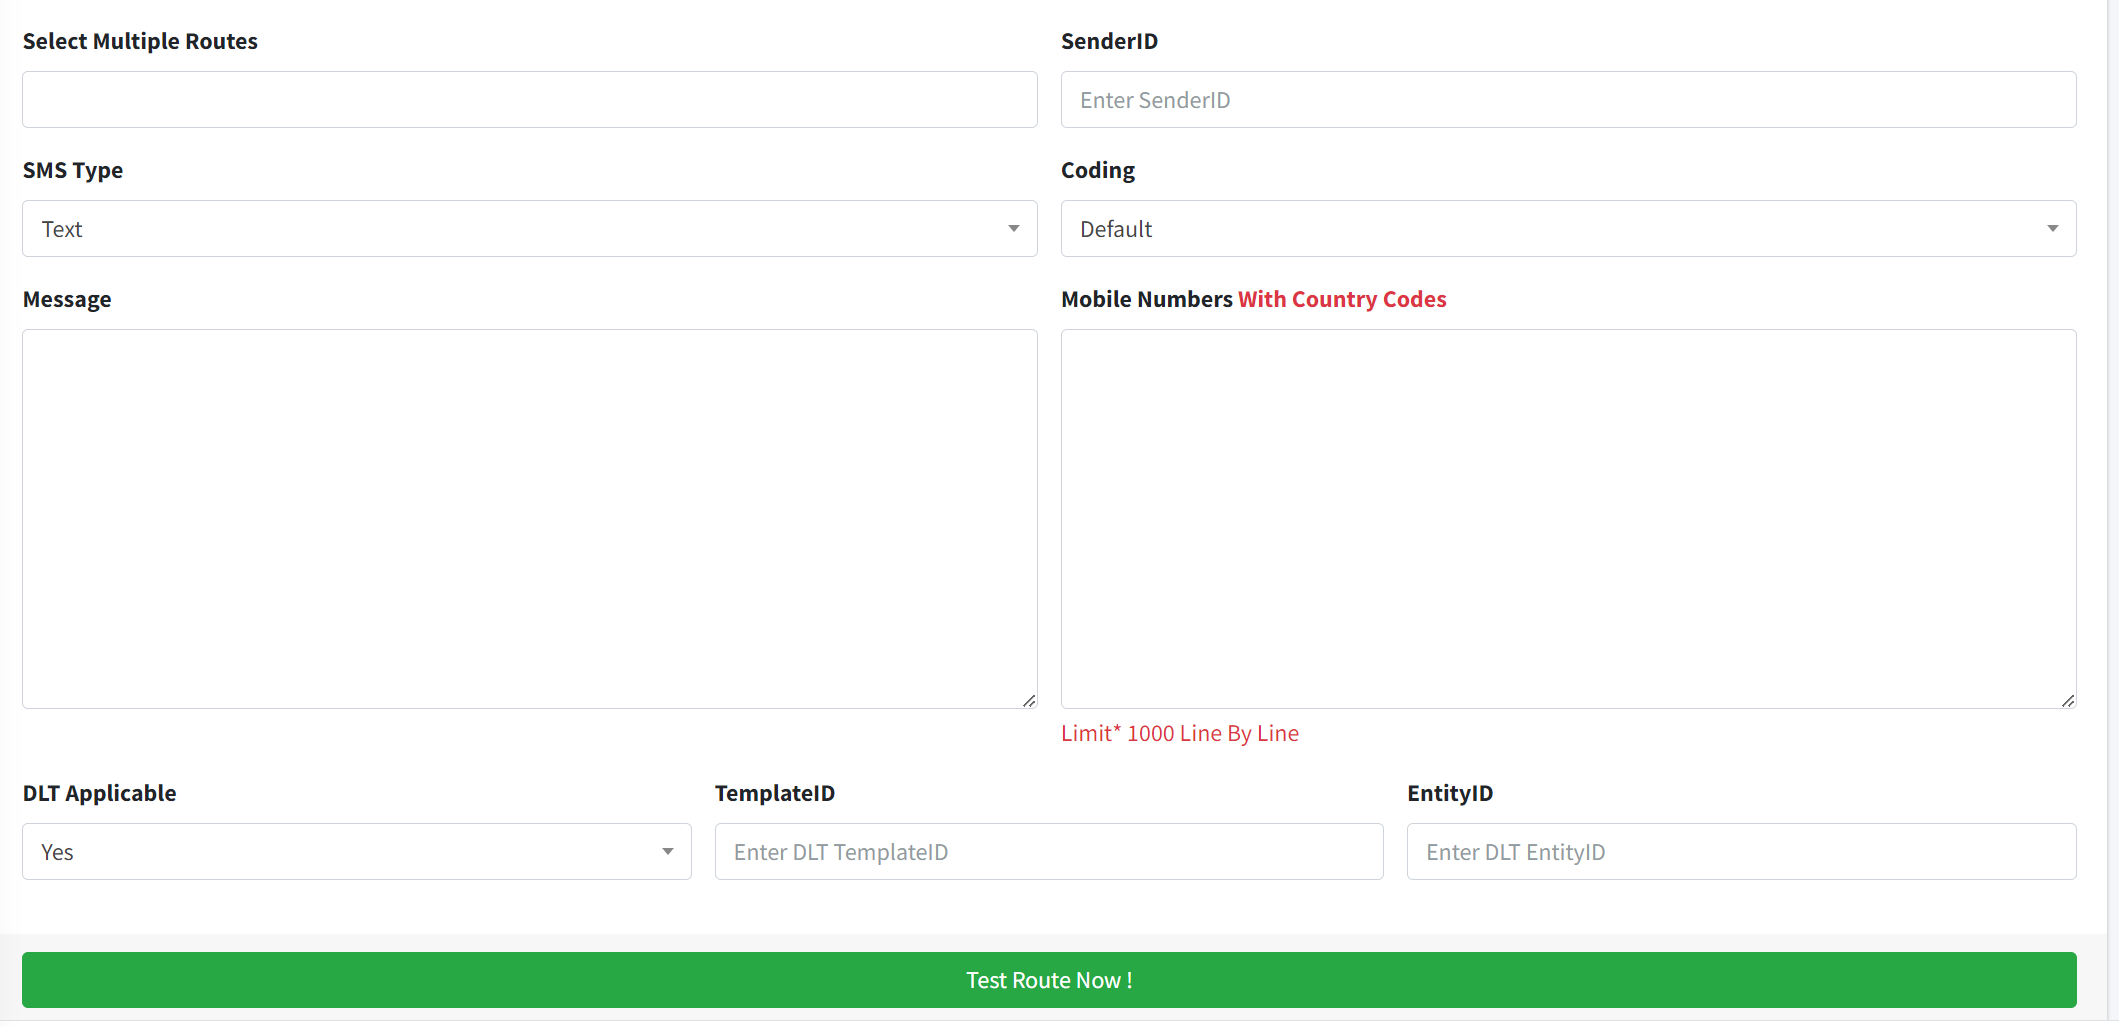
Select Multiple Routes :- Select multiple SMSC (Operator) you want to test.
SenderID :- Enter SenderID.
SMS Type :- Select SMS Type Text/Flash
Coding :- Select Normal/Unicode (Other Than English Language).
Message :- Enter Message You want to test.
Mobile Numbers :- Enter Mobile number Line by line.
DLT Applicable :- DLT applicable only for India country.
Test Report
In the test report section you can check the route test result weather route is working or not.
EntityID Section

in this section you can add your DLT entity ID Note:- Valid only if your sending sms in india
Template ID Section

In this section you can add your message template
Select Client :- Select your customer name.
Enter TemplateID ID :- Enter TemplateID
Content :- Enter Your Message Body, for dynamic word which change everytime in message used this keyword {#var#} ,
( {#var#} this is your dynamic word space.)
Below the table you can check all your customer template ID.
Invoice Section
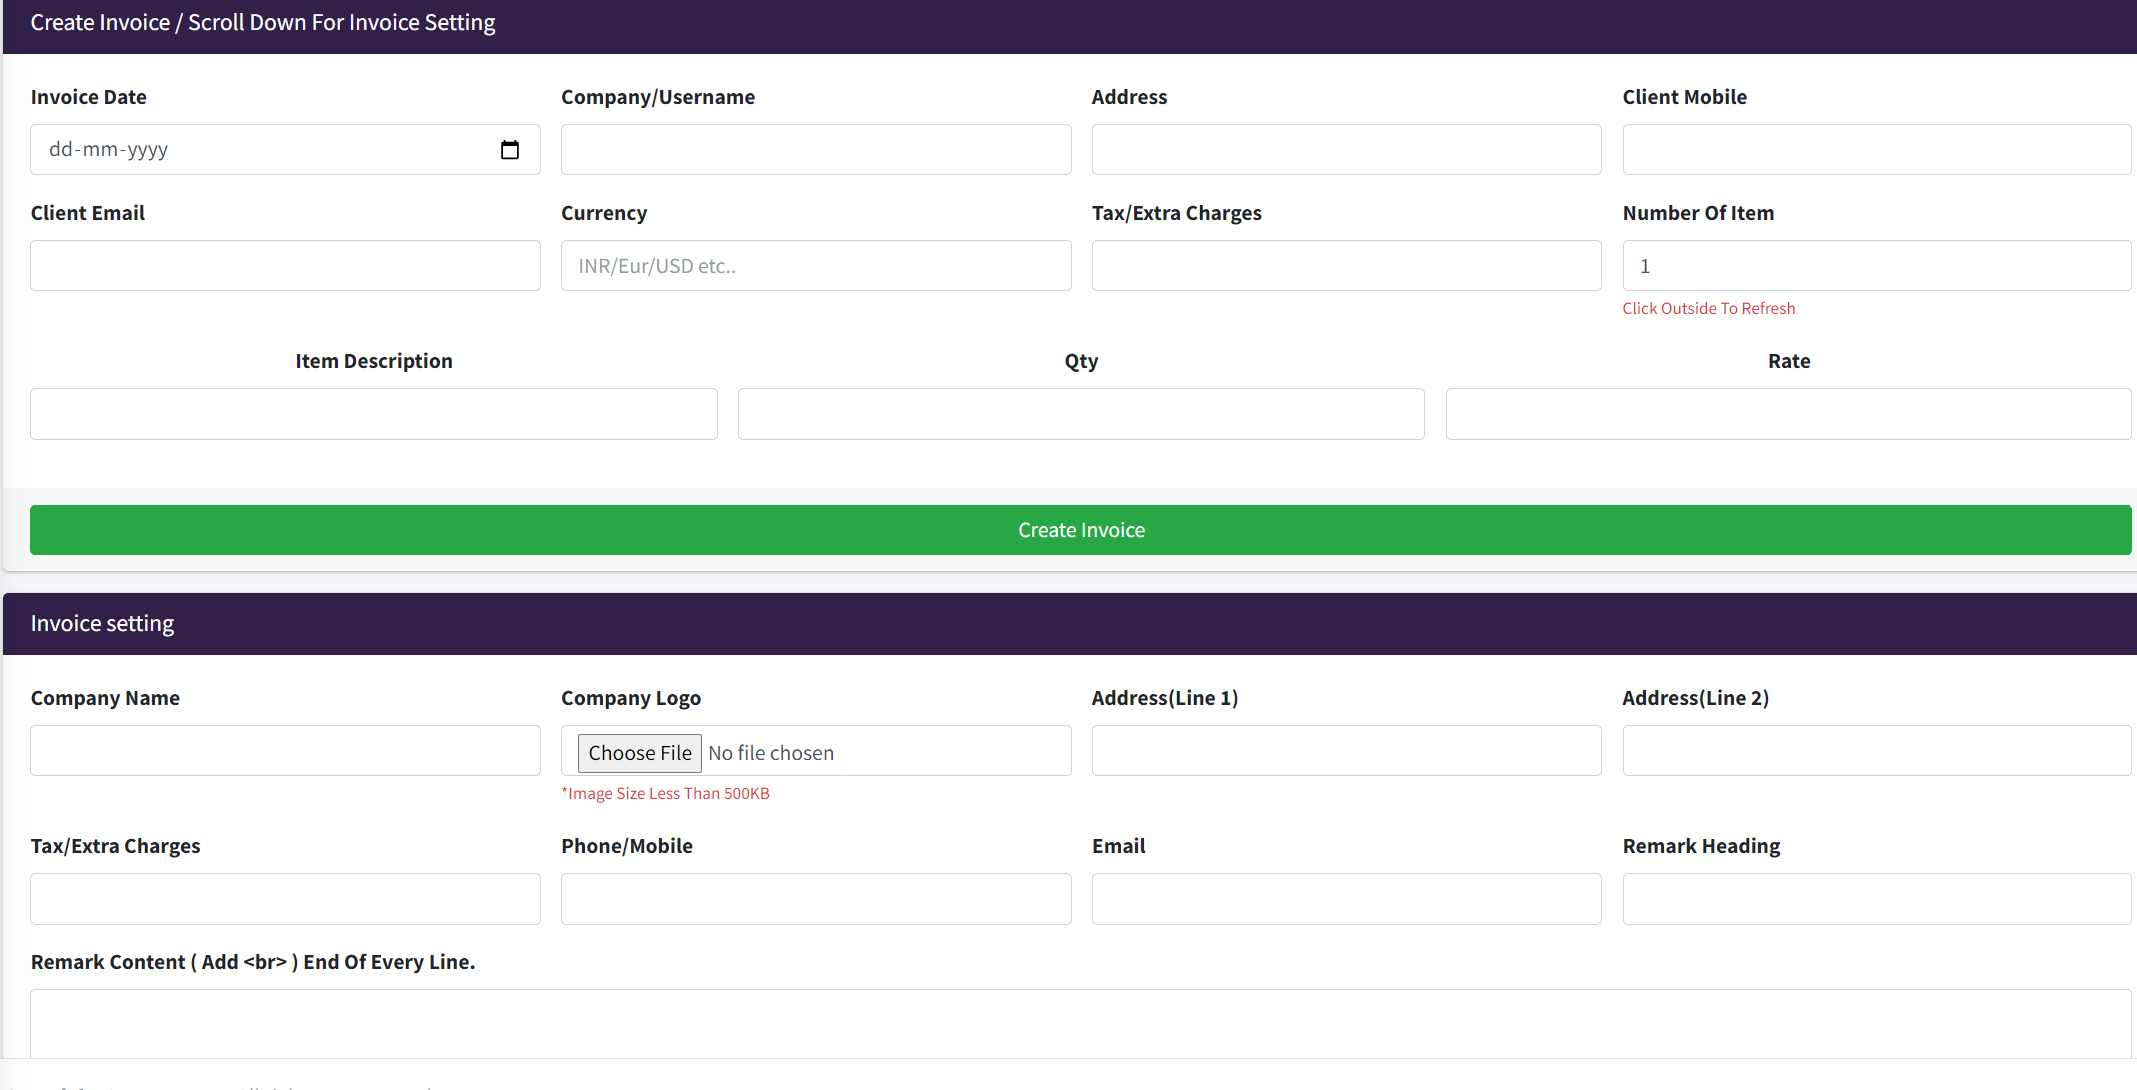
Invoice Date :- Date of invoice.
Company/Username :- Enter Company OR Username of customer.
Address :- Billing Address of customer.
Client Mobile :- Enter The Mobile Numbers.
Client Email :- Enter The Email Address.
Currency :- Enter The Currency , you want to make bill.
Tax/Extra Charges :- Do you want to charge any tax from customer, then enter the number it will be in percentage.
Number Of Item :- Number Of Item customer buy.
Item Description :- Enter The product description.
Qty :- Total quantity.
Rate :- Amount you want to charge.
In Setting Section you have to write the company information.
View Invoice Section
In this section you can see all the invoice you have created in form of table.
Esme Port Log Section

In this section we can see at our smpp port Log, what activity is going on, like we can see Total number of SMPP user is conntect with us.
tester1 and d_demo they are two user which is conntect with smpp api at port number 2345 and we can total number of MT/MO/DLR/ERROR SMS userwise. also we can see ip address of custer and connect time informations.
Gateway Status
In this section we can see all the information of sms gateway (Kannel) , like how many sms we have send from different SMSC, pending DLR, total number of sms failed , sent to SMSC and also since how many days our gateway is running.
Create Role Section

Name :- Enter Member Name .
Username :- Username For Login.
Mobile :- Enter the mobile number of Member.
Password :- Create The Password for Member.
Note :- For Privilege you want to give your team member.
Select Role :- Select Role For Your Member.
ESME Config Section :-
Here you can active port number for smpp API with service port number
Note :- Only For Installation team
Kannel SMS Gateway Configurations
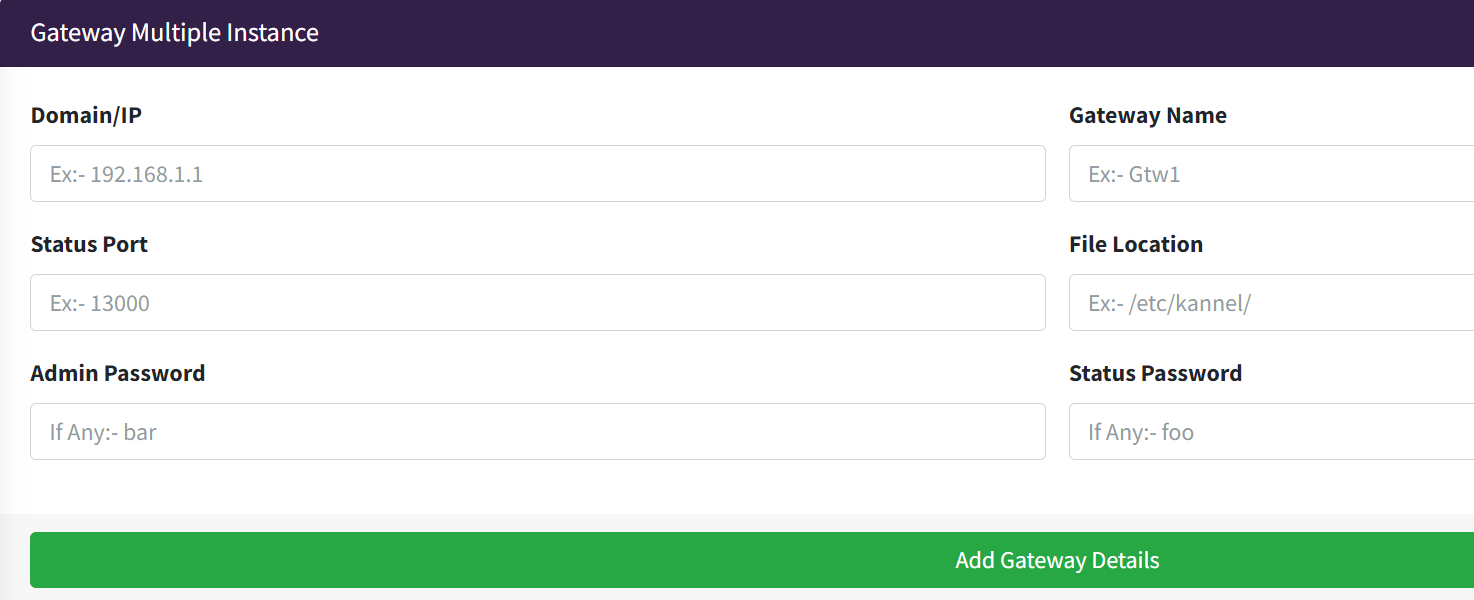
Domain/IP :- Enter The Public IP Adress of kannel server
Gateway Name :- Give any name for gateway.
Status Port :- Enter The port number of gateway where you can check sms gateway status page.
File Location :- by default location "/etc/kannel/".
Admin Password :- password for gateway to make any change from portal.
Status Password :- password for gateway to see the status page.
Note :- This configuration only for installation company.
Add SMPP / HTTP SMSC (Operator)
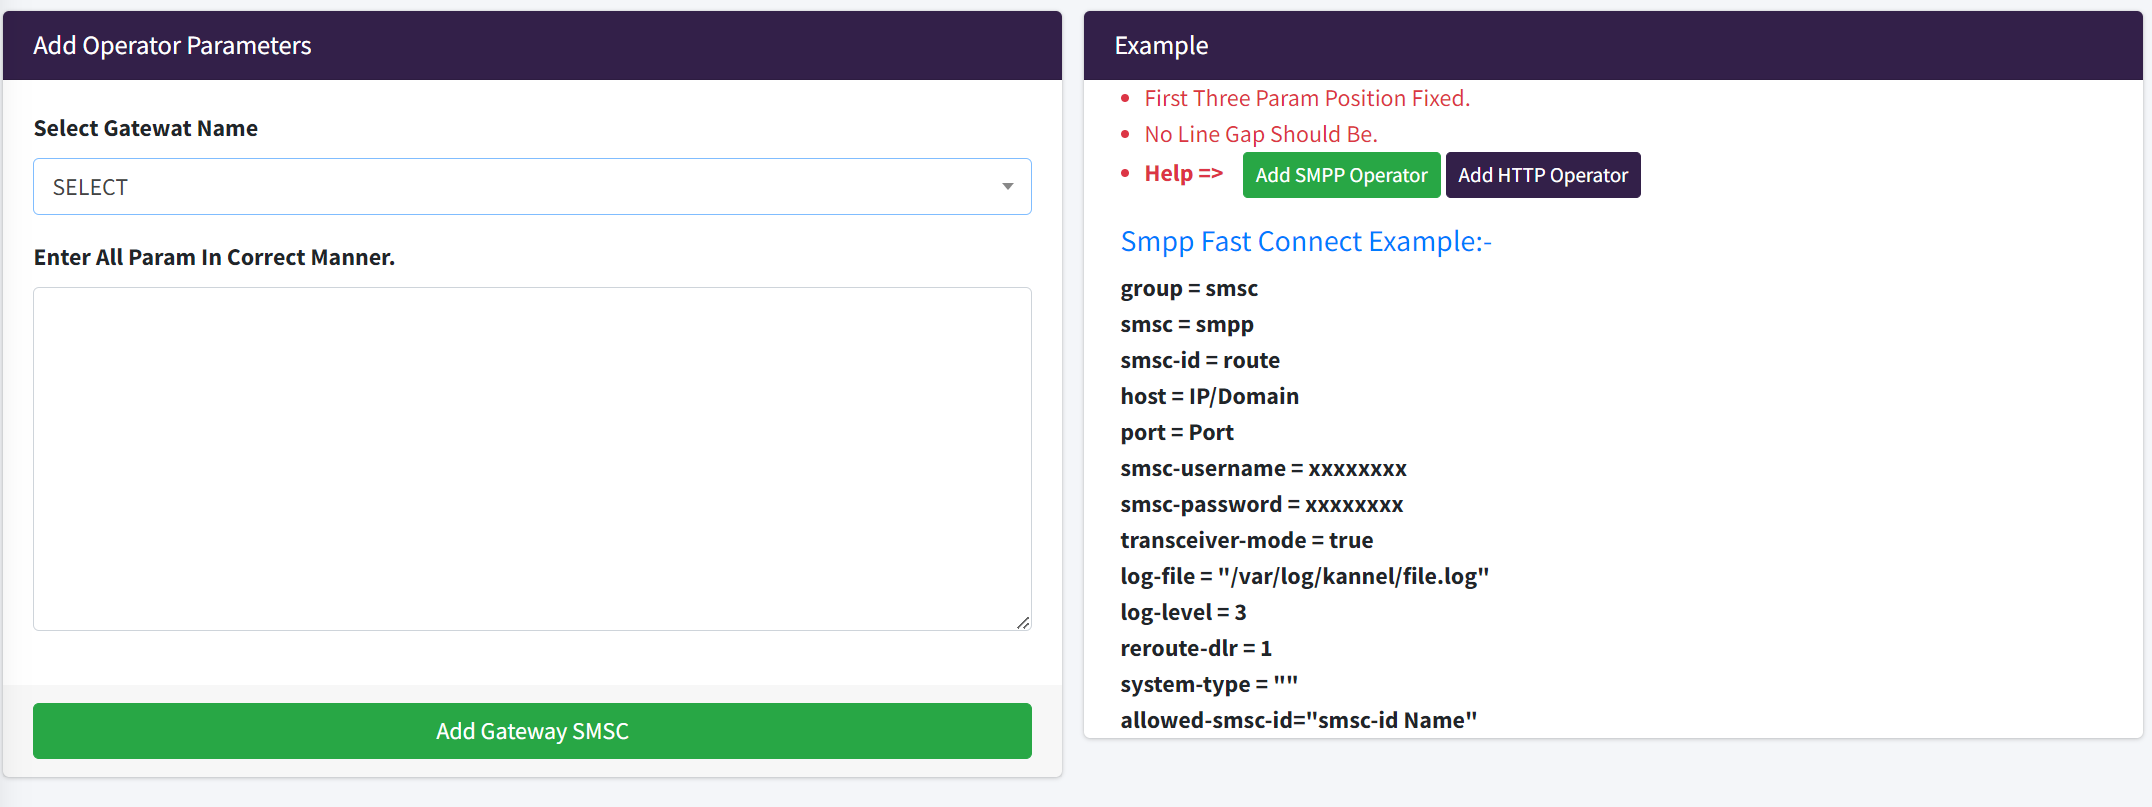
These are some basic parameters of binding SMPP API
group = smsc (Fixed)
smsc = smpp (Fixed)
smsc-id = Enter The name of your provider without any space.
host = Enter The Ip Address of SMSC Provider
port = Enter The Port Number of SMPP api , provided by SMSC Operator.
smsc-username = Enter Username of SMPP APi
smsc-password = Enter Password of SMPP APi
transceiver-mode = true (Fixed)
log-file = "/var/log/kannel/Enter The name of your provider without any space .log"
log-level = 3 (Fixed)
reroute-dlr = 1 (Fixed)
system-type = "" (Fixed)
allowed-smsc-id= Enter The name of your provider without any space.
You can add more parameters by click on Add SMPP Operator button in example box.
And If you want to Add HTTP API here are some basic parameters for adding Http api
group = smsc (Fixed)
smsc = http (Fixed)
smsc-id = Enter The name of your provider without any space.
system-type = generic
send-url = "http://localhost/?Mobile=%p&message=%b&senderID=%p"
status-success-regex = "ok"
allowed-smsc-id= Enter The name of your provider.
log-file = "/var/log/kannel/Enter The name of your provider without any space.log"
alt-charset="UTF-8"
alt-dcs=1
throughput= Message Per second you want to pass at http api.
You can add more parameters by click on Add HTTP Operator button in example box.
View SMSC Section
In this section you can view your all HTTP & SMPP provider and you can edit or delete them from this section.